Do you want to add push notifications to your WordPress site? Push notifications allow you to send notifications to users even when they are not visiting your website.
In this article, we will show you how to easily add web push notifications to your WordPress site. We will also talk about the best WordPress push notification plugins and how to send desktop & mobile push notifications from your WordPress site.
What is Push Notification?
Push notifications are clickable messages displayed on top of user’s desktop or notification area on their mobile device. They can be shown even when the user’s browser is not open.
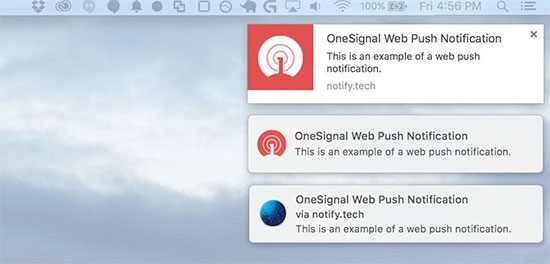
Aside from desktop, web push notifications also work on mobile devices. This allows you to reach your users across devices with latest updates and offers. Web push notifications have proven to be a very effective way to convert website visitors into customers and loyal followers.
Why Add Web Push Notifications to Your WordPress Site?
We have already discussed that 70% of people who leave your website will never come back. This is why you need to convert those website users into subscribers or customers.
You can do this by utilizing multiple channels at once. This includes email marketing, social media, mobile or SMS marketing, and web push notifications.
While email lists are still the most dominant and effective marketing tool at your disposal, push notifications for us are proving to be quite effective.
Here is why:
- Users need to give their explicit permission to receive push notifications. This means they are already interested in what you have to offer and are more likely to engage with notifications.
- Push notifications are shorter and demand less attention than email or social media updates.
- There is no algorithm, so nearly 100% of messages are delivered.
- Users can control how their devices display notifications, they can snooze them, or turn them off entirely.
- Not as many companies are using it.
Popular sites including Facebook, Pinterest, LinkedIn, and many others understand the importance and are already using web push notifications.
These notifications are more engaging than SMS, email marketing, and social media platforms. According to a survey, push notifications have a 50% higher open rate than email and twice as much click-rate.
Having said that, let’s take a look at how to add web push notifications to a WordPress site.
Setting up Web Push Notifications in WordPress with OneSignal
OneSignal is a free push notification service for WordPress websites. It allows you to easily add push notifications to any website.
First thing you need to do is install and activate the OneSignal plugin. Need help installing the plugin? See our step by step guide on how to install a WordPress plugin.
Upon activation, the plugin will add a new menu item labeled OneSignal to your WordPress admin bar. Clicking on it will take you to the plugin’s settings page.
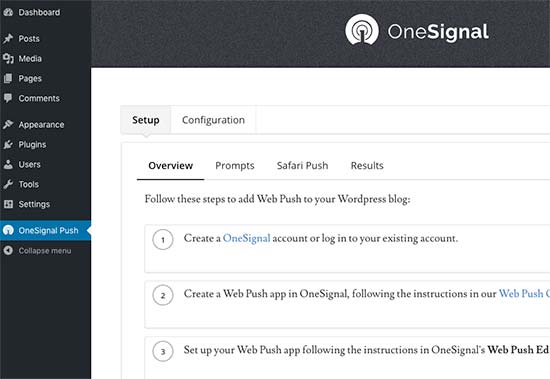
The settings page is divided into Setup and Configuration tabs. The setup tab is actually detailed documentation on how to setup OneSignal push notifications in WordPress. It has the same steps that we will show you in this tutorial.
To setup OneSignal, you will need to add API Key and APP ID into the plugin settings.
Let’s get started.
Step 1: Setting up OneSignal Push Notifcations
First, you need to visit the OneSignal website and click on the get started button next to the Web Push option.
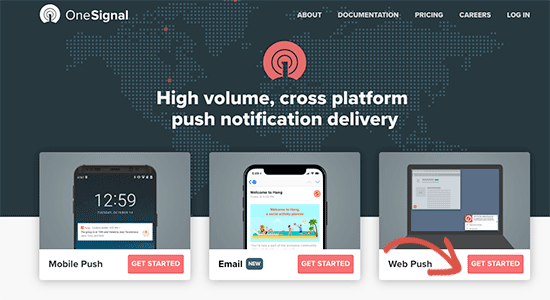
You’ll be asked to provide your email and password to create a free account. After your account is created, you’ll reach the OneSignal dashboard.
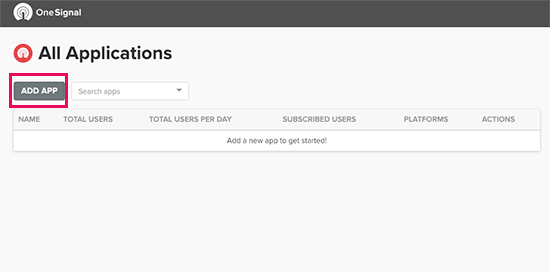
On the dashboard, click on the ‘Add App’ button to create your first app.
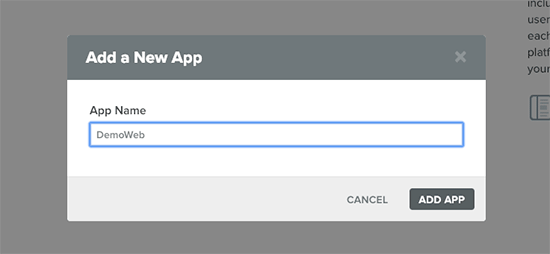
You’ll be asked to provide a name for your app. You can use anything here that helps you identify it.
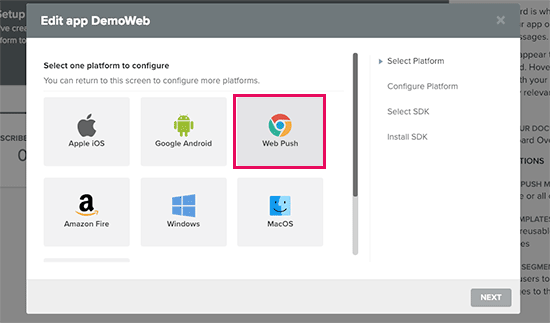
Next, you’ll need to select a platform. You can select multiple platforms for an app. For now, we recommend selecting ‘Web Push’ and click on the next button to continue.
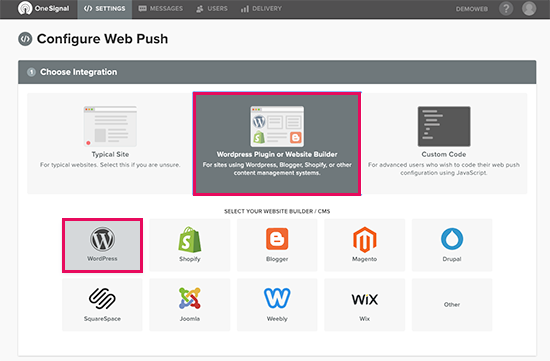
In the next step, you’ll be asked to select an integration method. Go ahead and click on ‘WordPress Plugin or Website Builder’ box and then select WordPress.
When you scroll down a bit, you will see a ‘WordPress Site Setup’ section.
You need to enter your website name, URL, and upload a logo. This logo would appear in your notifications, so we recommend using your site icon (favicon) or website logo.
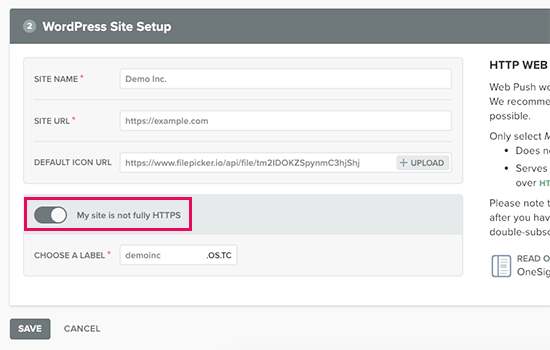
Below that, you will see a toggle that you can turn on if your WordPress site is not using SSL/HTTPS. You can only send web push notifications from a secure HTTPS URL. If your WordPress site is not using HTTPS, then you need to turn this setting on and enter a label.
A label is basically a subdomain hosted on OneSignal servers using a secure HTTPS URL. This subdomain will be used to send your push notifications.
If you want to setup HTTPS on your own WordPress site, then see our step by step tutorial on how to move WordPress from HTTP to HTTPS. We highly recommend using your own domain with SSL than a subdomain on OneSignal, so you’re not forever locked in to their platform.
Once you are done, click on the save button to store your OneSignal settings. You’ll now see the API keys that you need to copy.
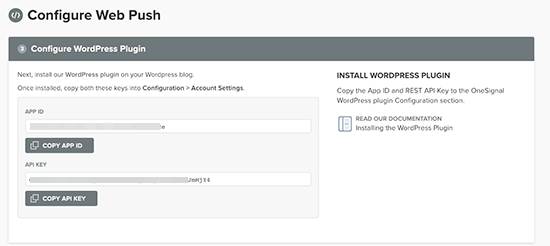
Now, you can switch back to OneSignal plugin settings on your WordPress site and switch to the ‘Configuration’ tab. You need to paste the APP and API keys you copied earlier.
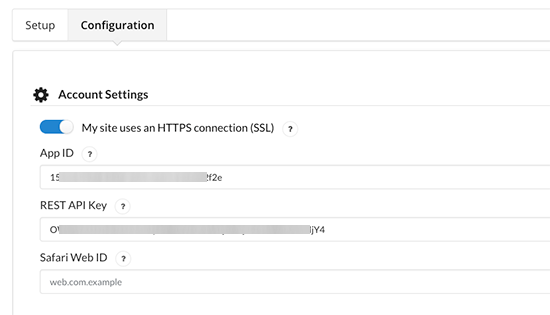
These API keys will only allow you to send push notifications via Chrome and Firefox web browsers.
You will also need Safari Web ID in order to send Push notifications via Safari web browser.
To get the Safari API key, you need to switch back to OneSignal website and go to the settings page for your app. Once there, you need to click on the edit icon next to Apple Safari.
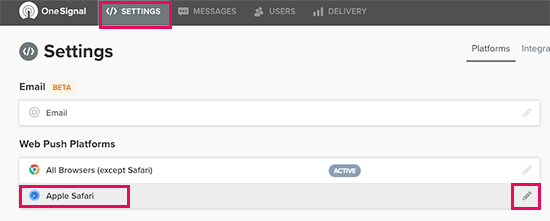
Next, you’ll be asked to enter your website title, URL, and optionally upload a site icon.
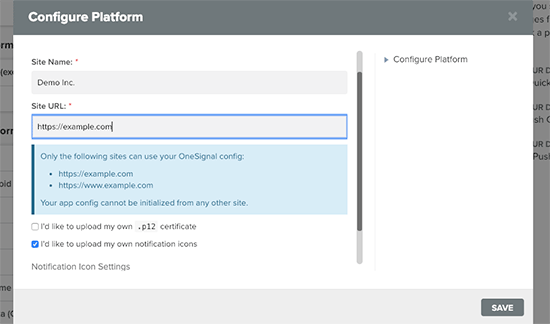
Click on the Save button to store your settings. After that, you’ll see your Safari Web ID on the screen which you need to copy.
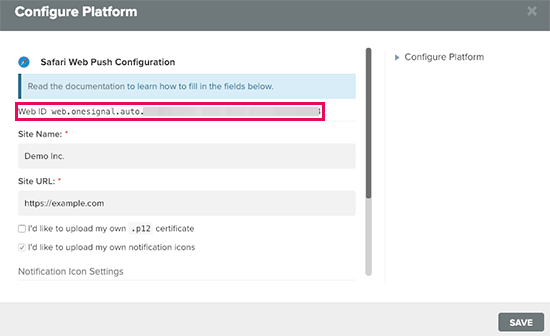
Once again, switch back to the plugin’s settings page on your WordPress site and paste the Safari Web ID under the configuration tab.
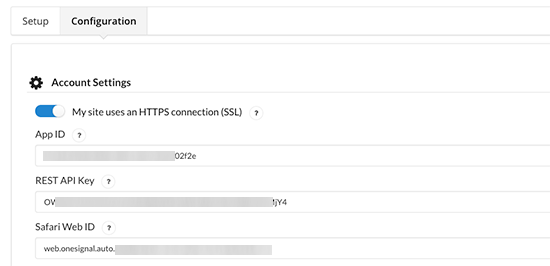
Don’t forget to click on the save button to store your plugin settings.
You can now visit your website in a new incognito browser tab. You will see a push notification popup on the top and a bell notification icon at the bottom right corner of the screen.
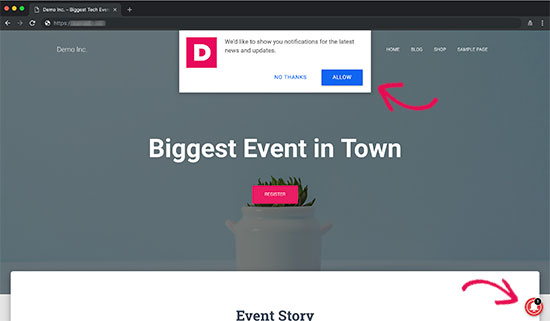
The push notification popup will also appear on mobile browsers.
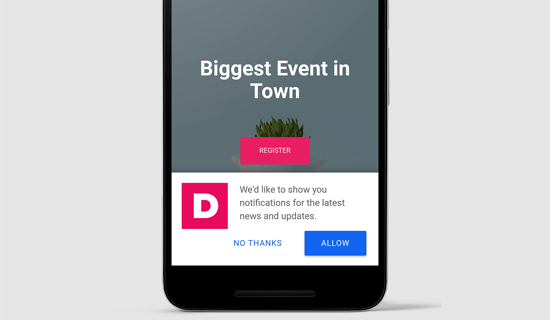
Note: The appearance of push notification popup prompt may differ based on http/https settings of your site.
Now, you may be wondering why this push notification prompt looks different than what you see on some other websites?
Normally users see the browser default notification prompt, which looks something like this:
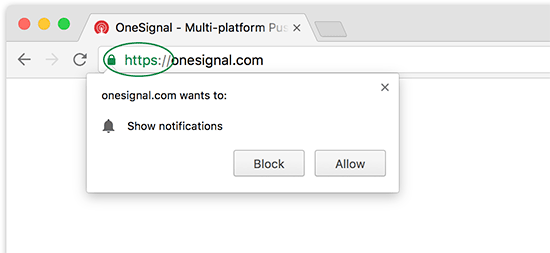
Now the problem is that, if a user clicked on ‘Block’ button, then they will never see a prompt for subscribing to notifications. To fix this, OneSignal comes with two different prompt types.
The first one is the push notification popup and the other one is the subscription bell icon. Both of them are fully customizable, and you can change them to meet your needs.
Step 2. Customizing The Push Notification Popup Prompt
The basic push notification popup is quite simple. It uses generic language and displays your site’s logo. You may want to customize that to make it more personal.
Simply switch to the configuration tab under OneSignal plugin’s settings page on your WordPress site and scroll down to the ‘HTTP Pop-Up Settings’ section.
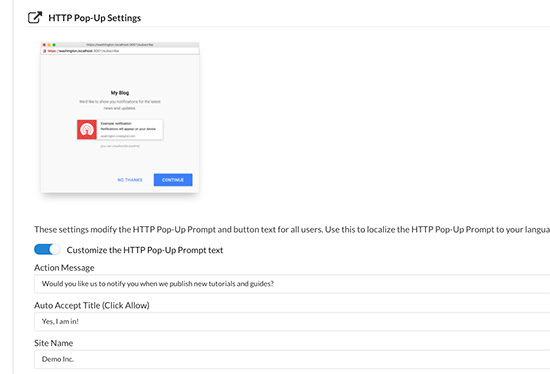
You need to click on the toggle next to ‘Customize the HTTP Pop-Up Prompt text’, and then start adding your own text.
Don’t forget to click on the Save button to store your settings before testing the prompt.
Step 3. Customize the Bell Notification Icon
Normally, the browser prompt for notification and the popup disappear when a user dismisses them.
What if users later change their mind and want to receive push notifications?
The subscription bell in OneSignal allows you to keep showing users a prompt to subscribe push notifications on your site.
The bell icon is also fully customizable from the plugin’s settings page. Simply scroll down to ‘Prompt Settings & Subscription Bell’ section and turn on the customization options that you want to change.
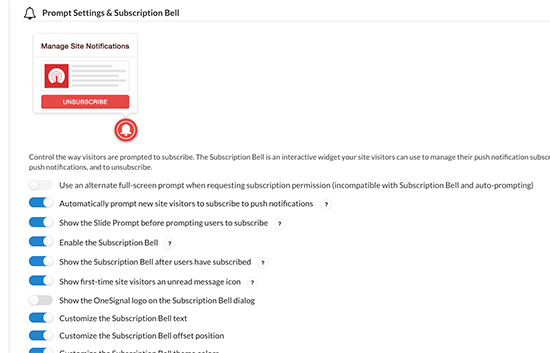
You can then scroll down and change settings for each option you want to customize. Ideally, you would want to change bell icon colors to match your own theme colors.
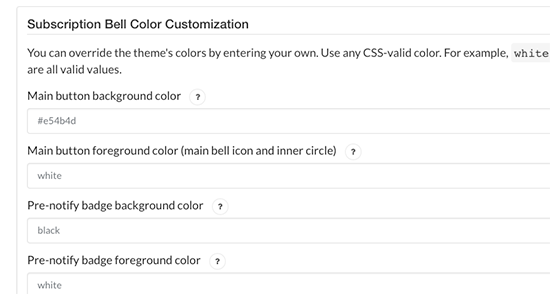
Note: We don’t use the bell icon because we feel it’s a bit too intrusive.
Step 4. Sending Push Notifications from Your WordPress Site
By default, the OneSignal plugin automatically sends push notifications for all new posts published on your website. If you want, then you can turn this feature off from plugin’s settings page under ‘Automatic Notification Settings’ section.

You can also manually send a notification when you publish or update a post. Simply edit a WordPress post or page, and you will see the OneSignal meta box under document settings column on the right.
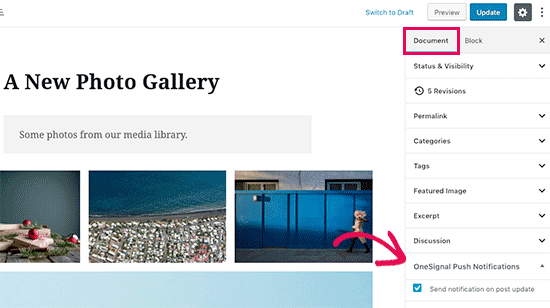
If you are using the old classic editor, then you will see the meta box like this:
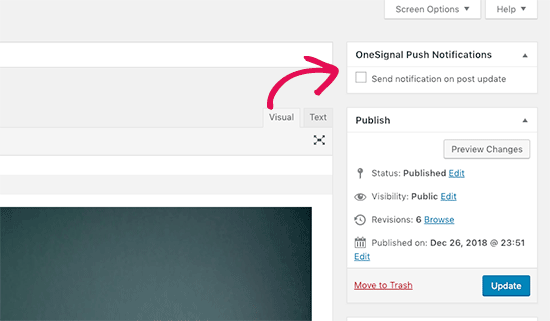
Check the box next to ‘Send notification on post update / publish’ and then click on update or publish button.
OneSignal will now send your article as a push notification to all your subscribers.
Send a welcome push notification to new subscribers
You can also send a welcome push notification to your new subscribers. Visit OneSignal’s settings page in your WordPress admin area and scroll down to the ‘Welcome Notification Settings’ section.
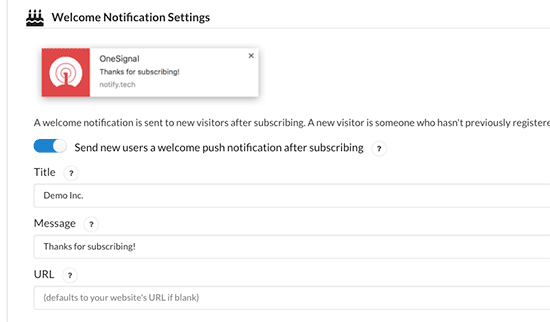
Now when a new subscribes for push notifications, they will receive a welcome notification on their device. Depending on their browser and device the notification may look different.
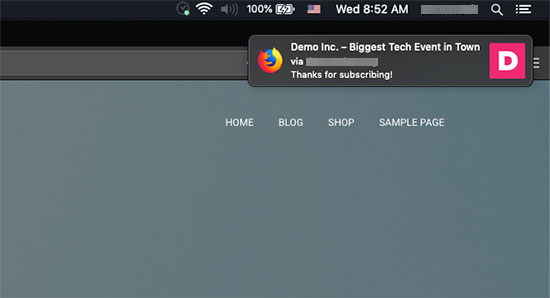
That’s all, you have successfully added web push notifications to your WordPress site.
You can also send custom notifications from the OneSignal app dashboard. The process is quite intuitive and you can follow onscreen instructions once you login to OneSignal.
Other Good WordPress Push Notification Plugins
It is important to choose the right web push notification service from the start. Since most providers try to lock you in their platform, changing your push notification service can result in losing your old subscribers. Meaning if you switch, then you will be starting from scratch.
This is why we recommend asking the provider you choose for all settings you need to configure to make your subscriber list portable.
At WPBeginner, we use OneSignal because it has the features that we need at a reasonable price.
- OneSignal offers a free WordPress push notification plugin with unlimited mobile push and web push notifications for upto 30K subscribers.
- Even their free plan includes features like segmentation, localization, tracking with Google analytics, and a robust API.
- You can use it with all top email marketing services to send your newsletter emails via web push notifications
WordPress is all about choices. Here are some other WordPress push notification plugins that you can also try.
- PushEngage Web Push Notifications – This is the connector plugin for PushEngage, a push notifications service provider. They have a free plan limited to 2500 subscribers, 120 notifications, and 5000 clicks.
- PushAlert – Web Push Notifications – Helps you connect to PushAlert web push notification service. They also offer a free plan limited to 3000 subscribers.
- PushCrew – Connects your website to PushCrew’s push notification service. They offer a free plan limited to 2000 subscribers.
- PushAssist – Connector plugin for PushAssist web push notification service. Their free plan is limited to 2000 subscribers.
We hope this article helped you learn how to add web push notifications to your WordPress site. You may also want to see our guide on how to get a free business email address for your website.
If you liked this article, then please subscribe to our YouTube Channel for WordPress video tutorials. You can also find us on Twitter and Facebook.
The post How to Add Web Push Notification to Your WordPress Site appeared first on WPBeginner.
from: WPBeginner
via Editorial Staff
Source: How to Add Web Push Notification to Your WordPress Site Via Business Advice.
Comments
Post a Comment